Thursday, February 18, 2016

My First Time Meal Prepping

So like most humans post-holidays, I have been considering a new way to lose a few pounds.  I’ve tried many diets over the years.  Calorie counting apps worked for a while, but then the novelty wore off.  I needed a new way to stay on track.  I decided to try meal prepping.

Meal prepping is essentially cooking all your food for the week ahead of time, then only eating what you have cooked and allotted for the day.  I read a few blogs and perused a few plans, but ultimately I came up with all my own plans, filled with things I knew I would like.  Some people make the same thing for all 7 days of the week, but I knew I would need VARIETY.  Because of this, my prep time was crazy… 5 hours the first time, but I’m now on week 6, and getting much faster.


In this blog I’ll share my first meal plan and shopping list, but I’ll also share what I learned after eating all the meals, because I have changed a few things now that I’m experienced.  (Ha.) 

Right now I’m aiming for 1200 calories a day.  I eat one lean cuisine or frozen meal per day, and the rest are prepped.  The meals I prepped were 400 calories each.

The meals were:

1 1/4 cups spaghetti squash
1/2 cup marinara
1/4 package Italian seasoned turkey sausage
1 fruit or 1/2 fruit with sugar-free pudding 

1/4 cup dry quinoa, cooked 
4 oz chicken OR 1/8 package taco seasoned ground turkey with 1 tbsp black beans
sautéed veggies, peppers, onion, zucchini, tomato 
1 tbps reduced fat cheese
1/2 fruit 

4 oz chicken
salad veggies 
dressing
1 fruit
sugar-free pudding

taco seasoned ground turkey
2 tbsp black beans
1 tbsp reduced fat cheese
salad veggies 
salsa 
1/2 fruit 

2 eggs
1 cup frozen potatoes o-brien
1/4 cup reduced fat cheese
sautéed onions, peppers, tomatoes 
1/2 fruit

fruit salad: 1/2 apple, 1/2 banana, 1/2 cup strawberries, tossed in lemon juice
yogurt
granola bar


I did pretty well with the shopping list.  Including the containers I purchased, which were $2.89 for a 3-pack (and I had 2 containers already), I only spend around $80.  I had leftover turkey, which freezes well for next time, and a few other things for next time like the potatoes, quinoa, and cheese.

The shopping list was:

a 3-pack of chicken breasts, which said 16 oz but cooked down to around 11
a package of italian-seasoned ground turkey
a package of taco-seasoned ground turkey (you could season your own, but the italian one is so good I decided to try the taco one too)
1 large bag of salad lettuce
4 small tomatoes
1 cucumber
1 zucchini
1 red onion
2 red peppers
1 large spaghetti squash
2 bananas
1 lb grapes
3 apples
3 grapefruits
1 package strawberries
1 lemon
sugar-free pudding
low calorie salad dressing
1 can black beans
reduced fat cheese
quinoa
marinara sauce
salsa
2 100-calorie yogurts
eggs
frozen potatoes o’brien

The first time through, I considered not pre-cutting everything, but I wanted everything to be all set and I wanted to take a nice picture of it all done!  However, I don’t do this anymore.  The apples tossed in lemon juice were fine (tossing them in lemon keeps them from browning), and the grapes and grapefruit were fine.  The strawberries and bananas were mushy and gross by time I ate them later in the week, however.  

I would also, if you can, purchase containers that are divided where the lid touches the divider.  Mine had a divider but the lid did not touch it, so the smells mingled and my grapefruit halves ended up smelling like taco meat in some cases.  A more expensive container that keeps food fully apart would fix that problem.

Lastly, when things could not fit, I simply placed a post-it on top saying “add 2 tbsp dressing” or “add 2 tbsp salsa.” (I now do this with the fruit too, so it stays fresh: “add 1/2 a banana,” and then cut it as I go through the week.)

I will say, though, I loved doing this!  It was really easy to follow, and stick with, because I don’t want to cheat because then all the food I cooked would go to waste!  As I went I also learned what I liked most.  For example, I actually wanted more yogurt and granola bars because they were good when I was on-the-go, and I was getting a little sick of salads and apples by the end of it all.  

My second week included buffalo chicken, chicken parmesan, and soup.    You can see my post-it method at work:


From there, I made a few new soups (which are low calorie and heat up well.  I recommend including soups in your meal prep).  I did enchiladas one week, chili, spaghetti squash Alfredo, and even zucchini chip nachos.


So far starting week 6, I have lost 7-8 lbs, and I am cheating on Saturdays now.  Last Saturday was Valentine’s Day and I went out for dinner, drinks, and even ate a doughnut and I still lost 3 lbs that week.  So it’s working…

Happy meal prepping!


Saturday, December 5, 2015

Chicago Cubs Ornament Wreath & New Holiday Ornament Wreath


The ornament wreath I made a few years ago (last one pictured above) is still my favorite craft of everything I’ve made.  I hang it every year and usually leave it up way after all my other holiday decorations have been taken down because I worked so hard on it and it just turned out so awesome.  I’ve thought about doing more (because it was also fun to do), but doing another large one would be super expensive (the amount of ornaments it required was ridiculous, I probably spend $80-$100 on the thing) and I thought doing a small one would also be pricey, and I also thought it would be difficult to find the right size ornaments for such a thing.  

Well, proving myself wrong, (sort of, I still spend like $45 per wreath on these), I recently DID make a smaller wreath, and then another one!  It all started when I was at Walmart with my boyfriend the other day and we saw some Chicago Cubs ornaments we liked.  They were nothing special, but they were okay.  A couple days later, I went to buy them for him as a surprise, but of course they were sold out.  So I thought to myself, I can go to 10 WalMarts trying to find them (hell), or, I can MAKE them.  And I can make them better!

So I went to Hobby Lobby, and that’s when the idea exploded.  I started putting red and blue ornaments in my cart, and then I saw the wreath forms, and then the wheels started turning… and well, I decided to go for it.  A Cubs wreath.  Even better than Cubs ornaments!

First I had to cut the wreath form to a size where the ornaments could sit around it and touch each other.  This was trial and error.  I trimmed, I checked, I trimmed some more, I checked, until 12 ornaments sat comfortably around the thing, touching each other, but not too tight.  


Next, I wrapped the form with tulle.  I would recommend ribbon, it’s way easier, but all I had at the time was tulle so I went with it.


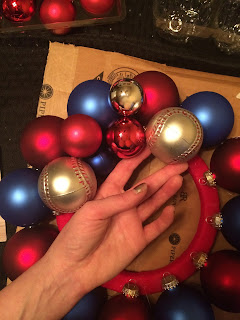
I began gluing the 12 outer large ornaments on first.  When I only had a couple left, I checked to make sure they were all going to fit correctly.  I had a little extra space so I used lots of glue between those so everything would be snug.

Then, I added some largish baseball ornaments.  I was still keeping it uniform at this point.  Have I mentioned before that I am terrible at this type of craft because I am a touch OCD and an incredible perfectionist?  I want everything to be balanced.  I spent a long time staring at the thing figuring out how to arrange things.


Uniformity went out the window after a while, and it should, because you want some of it to be random.  Thing is, you still want to keep it balanced.  So, me being me, I was unhappy with the placement of one ornament, and I tried to remove it.  This was the result:


I was so mad at myself!  I had to open another pack of ornaments I was going to return to replace this one.  Tip:  If you want to remove something already glued in place, use a hairdryer to loosen the glue.  I did that on the other side and it worked.  Do not just try to yank it off like I did.  Sigh.  In the end it was okay because I liked the ornaments I replaced it with better, but still.

You want to work large to small ornaments with this.  It’s nice to get some really small little ones to fill in gaps when you’re done.  I added a bow to hang it, like my large one has, but then I got rid of it because it looked too girly to me, and this was for my boyfriend.  He is hanging it with a large 3M Command hook instead and it works well.

The stupidest thing I did (stupider than breaking an ornament, even), was not painting the logos on before making the wreath.  I wanted to get it together before deciding where they went, so I didn’t do it first on purpose, but it made it much harder to paint them with the wreath together.

I spent a long time on the painting.  I didn’t want to screw up and ruin the whole thing.  I printed the logo, cut it out, and used that as a stencil, then I used acrylic paint and a small brush to very very very carefully paint the logos.  I think they turned out pretty nicely, actually, for being hang painted.  I was proud of myself.


Here’s a size comparison to the larger wreath I made years ago:


The Cubs wreath turned out better than I had expected.  And he was surprised!  He posted it on Facebook and everyone loved it and sad they wanted one (the Cubs fans, that is).  He tells me after Christmas he’s hanging it in is office at work.


Since I was on a roll, and now knew I could do a smaller wreath, I decided to also make one for my mom for a gift.  I hope she likes it!  I added a bow but she may opt to not use it, which would be fine.  I also added ornaments on the outside of this one for some extra shine and shape and it really added to the overall piece.


Overall, though expensive, these are so fun!  I totally recommend doing one.  If you can get ornaments after Christmas on clearance, even better!  I may try to do that this year and make even more next year!


Saturday, December 13, 2014

Angel Button Ornaments


Two years ago I made Christmas tree, Santa, and snowman button ornaments.  Well, recently I saw an angel on Pinterest, and I knew I had to add one to my collection.  I love her:


I purchased an array of white, pearl, and clear (with glitter!) buttons, as well as some beads for the heads and ribbon for the wings.  The first task was to sort the buttons for my towers:


I couldn't find gold buttons in the right size for the halos, so I painted pearlized buttons with gold glitter nail polish (which worked better than the gold glitter craft paint I tried):


The "wings" were the tough part.  I made a bow out of wired ribbon by tying elastic string around the center like so:


(Can you tell I had been trying on nail polish at the store before I did this?)

Then, to attach it to the ornament, I tied another, loose knot on the other side of the ornament string.  (You want the knot to be loose so that the bow falls behind the head bead.  I stuck the tips of my scissors under the knot when I tied it; you could also use a pencil.)


The extra elastic from the bow works as "arms" for the angel, the head and halo slide down, and they're done!

I made one for my mom and she put in an "order" for three more for her friends.  These were slightly more complicated than the others because of the wings, but worth it.


Friday, November 14, 2014

Bottle Cap Beer Mug

Hey there!  So I'd been thinking about what I could do with my favorite bottle caps, and this idea came to me out of nowhere.  Most of what's on this blog are Pinterest copy-cat projects, but this was a Bren original idea.  I think it turned out pretty great!  (Though it is somewhat fragile.)


First I laid out the caps the way I wanted them.  I decided to use skinny popsicle sticks to make a frame I could glue them to, so I positioned the sticks on top of the caps and used a glue gun to hold them together.  (wood glue would be better, but harder to undo if you make a mistake, which I did a couple times).  The frame ended up being double-thick, so I could glue the crossing pieces to the bottom of the top layer, then fill in the gaps so it all was the same thickness.  (Hope that makes sense; pictures may explain it better:)


Then I began to glue the caps to the wood.  I made sure to place them in each other's grooves to get them as tight as possible.  The main part was easy, but the handle gave me some trouble and I squished some of the caps to make them slightly narrower until everything fit. 


I hung it up in the kitchen!  Like I said, it's a little fragile, but sturdy enough to hang on the wall just fine.  I reinforced the corner caps with some extra glue when it was all done.  Here it is!


Thursday, July 3, 2014

Confetti Canvas Art

So I needed some art to go above my bed and I’d been trying to find the right piece or project for a while now.  I decided I would do a version of this Confetti Art that’s been going around Pinterest for a while.  I wanted to paint my canvases, and I thought about doing a gray background with colored dots, but it was proving hard to find matching shiny paper and glitter paper in the shades I wanted, so instead I decided to paint the canvases and use silver dots.  I think it turned out pretty cool:


So you know how I was proud of myself for spending under $20 on my Clothespin Wreath?  Well, not so lucky this time.  My first trip to Hobby Lobby set me back about $40 and then I had to run back for more paint later.  Canvases, paint, and the hole punch were to blame for most of the cost.  I purchased 16 x 20 canvases because they come in those discount 2-packs for even less than the cost of one regular canvas, even though I thought the size may be too big.  Once I got them up though, I think the size worked out just fine.  


I used a 2-inch hole punch for the circles. (Hobby Lobby has almost any size circle punch you can think of.)  They were all out of regular silver glitter paper, but they had a chunkier glitter paper that I thought looked even cooler.  However, when I got home and tried punching it, there were problems.  Honestly, I’m surprised the punch didn’t break because it got stuck on pretty much every turn with the chunky glitter paper.  The problem wasn’t the thickness, it was that glitter was jamming it up.  I had to clean it out after every punch.  So, for that reason I would not recommend the chunky glitter paper, although it looks stylish.  Before I had even painted anything I had laid out the circles to decide how may I would need per canvas.  I decide on 12 metallic and 10 glitter per canvas.  


The worst part was getting the paint color right.  I first purchased 2 acrylic paints in teal and orchid that I thought were perfect as they looked in the tube.  Well, the orchid was okay, but the teal dried way darker and greener than anticipated.  I went back for a lighter, bluer shade, but then that was too light.  In the end I had just enough paint left to mix up a shade I hoped would work, and it was good enough.  But man, it was a pain.  


When everything was painted and I was (finally) satisfied with the colors I started placing the circles.  I spent forever trying to get them to look even but random.  When I was done, I glued them to the canvas with Mod Podge one at a time.  I know a lot of people have been using spray adhesive, and that’s probably better.  The Mod Podge worked okay, but the edges of some of the circles are curling up, and I might have to re-glue some of them some day.


And then, tah-dah, they were ready to hang!  I didn’t spray any type of over-coat or seal on the finished product; however, the glitter does flake off, so if I start waking up with glitter on my face, I might have to do that later.  I like how they match my flowers on the corresponding wall:


Kitty-approved.  Another summer project complete!